
Getting Started With Your Cultivar Lab
Choose Your Model
STEP-BY-STEP GUIDE ON USING THE DEVICE
The Cultivar Lab Seed Germination Device is designed to optimize the germination process, providing a controlled environment for your seeds to sprout successfully. Follow this step-by-step guide to ensure the best results.
How to Operate The Cultivar Lab Seed Germination Device: A Step-by-Step Guide
Using Our Temperature Controlled Seed Germination System is an easy and effective way to sprout seeds quickly and consistently. Whether you’re a beginner or an experienced grower, this guide will help you maximize the potential of your device and ensure a successful start for your plants.
What You’ll Need:
- Cultivar Lab Seed Germination Device
- Quality seeds
- Distilled or pH-balanced water
- Cotton Pads (Included)
Step-by-Step Instructions
Step 1: Prepare Your Seeds
1. Select High-Quality Seeds: Choose seeds that are fresh and suitable for your desired plants.
2. Soak (Optional): For hard-coated seeds, soak them in water for 6–12 hours to soften the shell and speed up germination. Adding A Few Drops of Hydrogen Peroxide To the Solution Will Also Help!
3. Label: If germinating multiple seed types/strains, keep track of the seeds which you place in every individual numbered pod. TIP: Write down the number of each pod (1-6) AND each seed that’s included.
Step 2: Set Up the Device
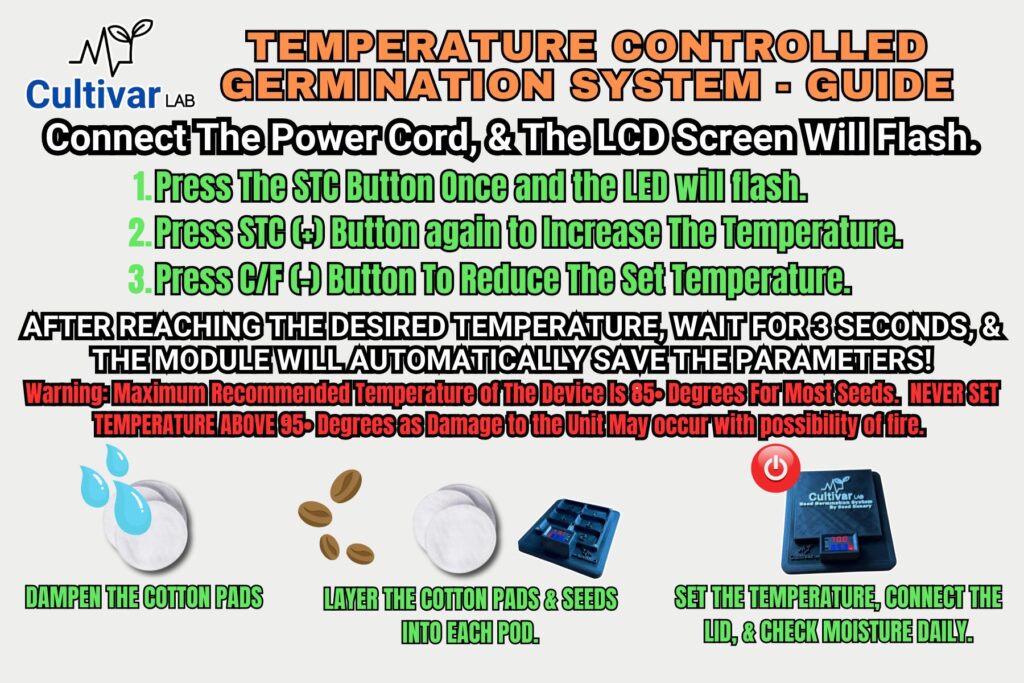
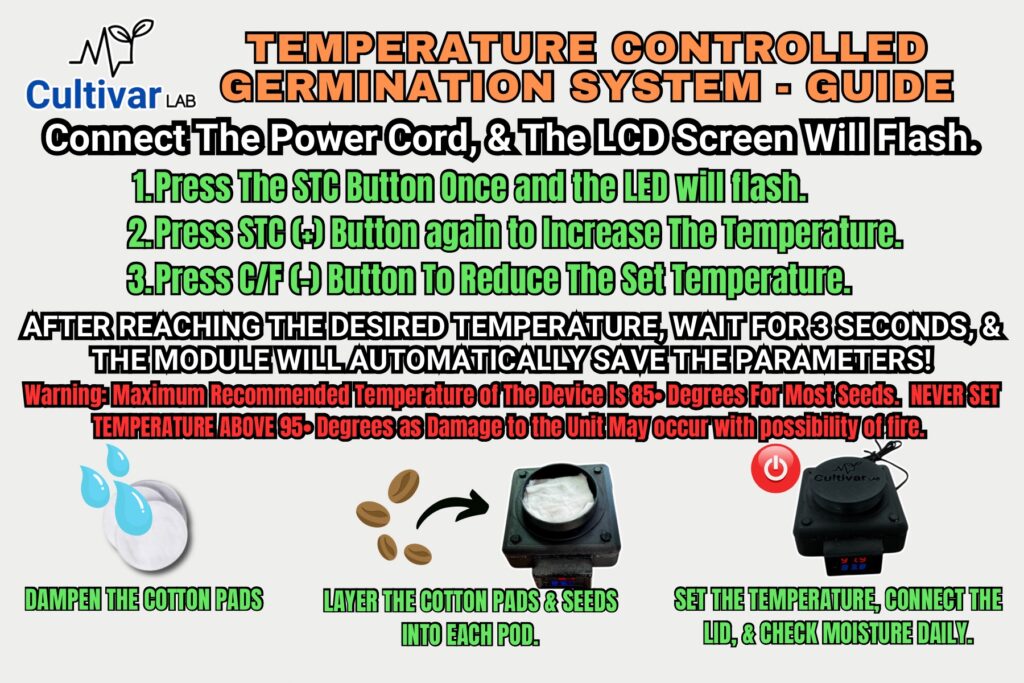
1.Power on The Device: Plug in the power cord, ensuring that the LCD Screen lights up confirming your device has power.
Step 3: Add the Seeds
1. Soak The Cotton Pads: Place one layer of (moistened) cotton pads into each pod
2. ADD Your Seeds: place the variety of seeds onto each cotton pad, keeping track of which numbered pod your seeds are in.
3. Cover Lightly: lightly cover the seeds by folding the other end of the cotton pad over them, or add an additional cotton pad layer to cover the seeds with.
Step 4: Adjust Temperature Settings
1. Temperature: Set the device to the recommended temperature for your seeds (usually between 75°F and 88°F). NEVER SET THE TEMPERATURE ABOVE 90°F AS DAMAGE TO THE DEVICE MAY OCCUR!
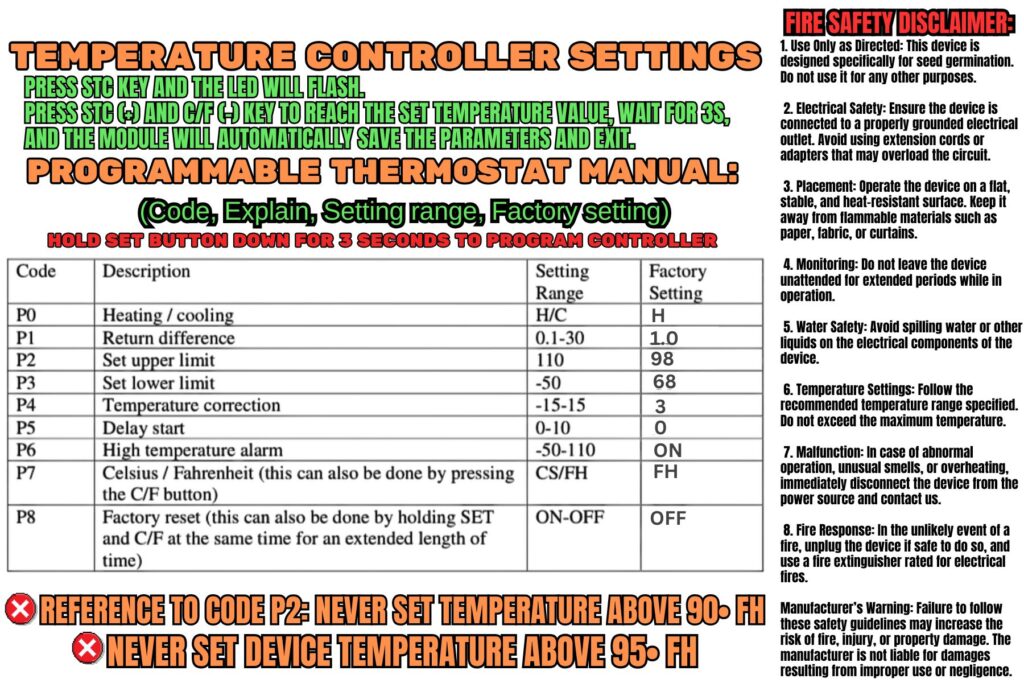
2. Controller Programming: For Controller programming Instructions Please refer to The Temperature Controller User Manual (Shown Below) Before attempting to program the device.
3. Cover: Place The Cover on The Device To Ensure The Temperature Remains Consistent
Step 5: Monitor Progress
1. Check Daily: Inspect the seeds daily to ensure they’re moist but not waterlogged. Mist Or Lightly Water the cotton pads when needed.
2. Keep Covered: Make sure the Device’s Cover remains on to ensure consistent temperatures.
3. Sprouting: Seeds typically sprout within 24–72 hours, depending on the plant variety.
Step 6: Transplanting the Seedlings
1. Timing: Once The seeds have cracked open and have a tap root, they are ready for transplanting.
2. Handle with Care: Use Your fingers OR Ideally a small tool such as tweezers to gently remove seedlings without damaging the roots.
3. Plant: Place the seedlings in pots or your garden, ensuring they’re positioned in a suitable growing medium.
Step 7: Clean and Store the Device
1. Disinfect: After use, clean the seed pods & The Device itself by using a sanitizing wipe to prevent mold or bacterial buildup. You can use a diluted Bleach solution of 10% bleach to 90% water, and paper towels to wipe down the device with. MAKE SURE TO NEVER SUMBERGE THE DEVICE UNDER WATER AS DAMAGE WILL OCCUR!
2. Dry Completely: Allow all components to dry before using again.
3. Store Safely: Keep the device in safe place until the next use.
Troubleshooting Tips
❌ Seeds Not Sprouting? Ensure proper warmth and moisture levels.
❌ Mold Growth? Reduce excess moisture and change Cotton Pads.
❌ Slow Germination? Some seeds naturally take longer; ensure optimal conditions.
Pro Tips for Success
• Follow Seed-Specific Instructions: Some seeds have unique germination requirements, so always refer to the seed packet or grower’s guide.
• Monitor Conditions: Make sure the seeds remain moist & NEVER Dry out!
• Avoid Overwatering: Excess moisture can lead to fungal issues like damping off.
• Experiment: Adjust settings and techniques to see what works best for different plants.
By following these steps, you’ll create the ideal conditions for your seeds to thrive, leading to stronger seedlings and more productive plants. Cultivar Lab takes the guesswork out of the Germination process, making it easier than ever to grow a successful garden! 🌱💡
Cultivar Lab: Temperature Controller – User Manual
STEP-BY-STEP GUIDE ON USING THE DEVICE
The Cultivar Lab Seed Germination Device is designed to optimize the germination process, providing a controlled environment for your seeds to sprout successfully. Follow this step-by-step guide to ensure the best results.
How to Operate The Cultivar Lab – Mini | Seed Germination Device: A Step-by-Step Guide
Using Our Temperature Controlled Seed Germination System is an easy and effective way to sprout seeds quickly and consistently. Whether you’re a beginner or an experienced grower, this guide will help you maximize the potential of your device and ensure a successful start for your plants.
What You’ll Need:
- Cultivar Lab Mini | Seed Germination Device
- Quality seeds
- Distilled or pH-balanced water
- Cotton Pads (Included)
Step-by-Step Instructions
Step 1: Prepare Your Seeds
1. Select High-Quality Seeds: Choose seeds that are fresh and suitable for your desired plants.
2. Soak (Optional): For hard-coated seeds, soak them in water for 6–12 hours to soften the shell and speed up germination. Adding A Few Drops of Hydrogen Peroxide To the Solution Will Also Help!
3. Label: keep track of the seeds placed in the Reservoir. TIP: Only germinate ONE Strain / Variety at a time to avoid misidentifying your seeds.
Step 2: Set Up the Device
1.Power on The Device: Plug in the power cord, ensuring that the LCD Screen lights up confirming your device has power.
Step 3: Add the Seeds
1. Soak The Cotton Pads: Place one layer of (moistened) cotton pads into The Reservoir.
2. ADD Your Seeds: place the seeds onto a single layer cotton pad,
3. Cover Lightly: lightly cover the seeds by folding the other end of the cotton pad over them, or add an additional cotton pad layer to cover the seeds with.
Step 4: Adjust Temperature Settings
1. Temperature: Set the device to the recommended temperature for your seeds (usually between 75°F and 88°F). NEVER SET THE TEMPERATURE ABOVE 90°F AS DAMAGE TO THE DEVICE MAY OCCUR!
2. Controller Programming: For Controller programming Instructions Please refer to The Temperature Controller User Manual (Shown Below) Before attempting to program the device.
3. Cover: Place The Cover on The Device To Ensure The Temperature Remains Consistent
Step 5: Monitor Progress
1. Check Daily: Inspect the seeds daily to ensure they’re moist but not waterlogged. Mist Or Lightly Water the cotton pads when needed.
2. Keep Covered: Make sure the Device’s Cover remains on to ensure consistent temperatures.
3. Sprouting: Seeds typically sprout within 24–72 hours, depending on the plant variety.
Step 6: Transplanting the Seedlings
1. Timing: Once The seeds have cracked open and have a tap root, they are ready for transplanting.
2. Handle with Care: Use Your fingers OR Ideally a small tool such as tweezers to gently remove seedlings without damaging the roots.
3. Plant: Place the seedlings in pots or your garden, ensuring they’re positioned in a suitable growing medium.
Step 7: Clean and Store the Device
1. Disinfect: After use, clean the Reservoir & The Device itself by using a sanitizing wipe to prevent mold or bacterial buildup. You can use a diluted Bleach solution of 10% bleach to 90% water, and paper towels to wipe down the device with. MAKE SURE TO NEVER SUMBERGE THE DEVICE UNDER WATER AS DAMAGE WILL OCCUR!
2. Dry Completely: Allow all components to dry before using again.
3. Store Safely: Keep the device in safe place until the next use.
Troubleshooting Tips
❌ Seeds Not Sprouting? Ensure proper warmth and moisture levels.
❌ Mold Growth? Reduce excess moisture and change Cotton Pads.
❌ Slow Germination? Some seeds naturally take longer; ensure optimal conditions.
Pro Tips for Success
• Follow Seed-Specific Instructions: Some seeds have unique germination requirements, so always refer to the seed packet or grower’s guide.
• Monitor Conditions: Make sure the seeds remain moist & NEVER Dry out!
• Avoid Overwatering: Excess moisture can lead to fungal issues like damping off.
• Experiment: Adjust settings and techniques to see what works best for different plants.
By following these steps, you’ll create the ideal conditions for your seeds to thrive, leading to stronger seedlings and more productive plants. Cultivar Lab takes the guesswork out of the Germination process, making it easier than ever to grow a successful garden! 🌱💡
Cultivar Lab: Temperature Controller – User Manual
Fire SAFETY DISCLAIMER:
Although it is extremely unlikely for your cultivar lab to catch fire, its essential that we make sure our customers follow the rules listed in this fire safety disclaimer & are aware of the do’s & don’ts of using our device.
1. Use Only as Directed: This device is designed specifically for seed germination. Do not use it for any other purposes.
2. Electrical Safety: Ensure the device is connected to a properly grounded electrical outlet. Avoid using extension cords or adapters that may overload the circuit.
3. Placement: Operate the device on a flat, stable, and heat-resistant surface. Keep it away from flammable materials such as paper, fabric, or curtains.
4. Monitoring: Do not leave the device unattended for extended periods while in operation.
5. Water Safety: Avoid spilling water or other liquids on the electrical components of the device.
6. Temperature Settings: Follow the recommended temperature range specified. Do not exceed the maximum temperature.
7. Malfunction: In case of abnormal operation, unusual smells, or overheating, immediately disconnect the device from the power source and contact us.
8. Fire Response: In the unlikely event of a fire, unplug the device if safe to do so, and use a fire extinguisher rated for electrical fires.
Manufacturer’s Warning: Failure to follow these safety guidelines may increase the risk of fire, injury, or property damage. The manufacturer is not liable for damages resulting from improper use or negligence.
Please Email us if You Have ANY Questions or Concerns About Your Device, We Want To See Each & Every Customer Have A Successful Germination!